


How does it work?
The bot is embedded into a website as a widget and is activated when a visitor performs an action on the website: opens or scrolls a page, clicks on an element, etc. (you set up the trigger to launch the bot yourself). The bot makes an offer and asks qualifying questions. Then it saves a user's contact and sends you a notification about a new application.
How to set up the bot?
Create a project in the constructor and copy this template. 2 scripts will appear in your project. If you plan to embed a bot into a widget, we recommend working with the “Lead form in widget” script — the first block for launching the widget on the site is configured here.
Set up a widget.
Place the widget on the website and configure the constructor to launch a trigger message based on an “Event on the website.” Then, in the constructor, insert a link in the page or website.
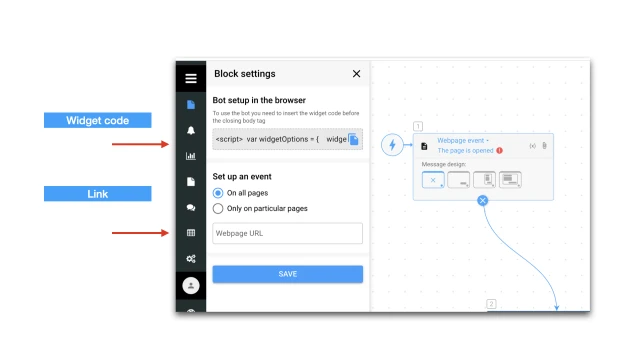
In the “Settings” section, configure a widget to launch by event and upload an avatar.

Set up a script.
1. Think over and add qualifying questions for a website visitor. We recommend asking no more than three questions, with multiple possible answers.
2. Think about your offer. In this example, we show a static offer, but it can also be made contextual – it will change for each user depending on the UTM tags.
3. To make it more attractive, you can add a video, gif or picture to the first message. To do this, click on the cross in the right corner of the block and add a file.
4. In the “Save contact” block, enable/disable different communication channels: Telegram, email, phone.
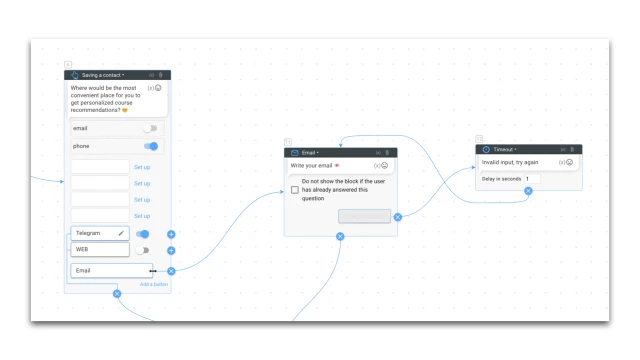
5. In the “Notification” block, specify the email to which the bot will send you messages about new applications.

And one last thing.
1. Set up the messenger in the “Settings” → “Messengers” section.
2. In the “Settings” → “Bot Design” section, add a background and avatar for the web version of the bot.
If you have any questions about setting it up yourself, write to the Telegram community.