


How does it work?
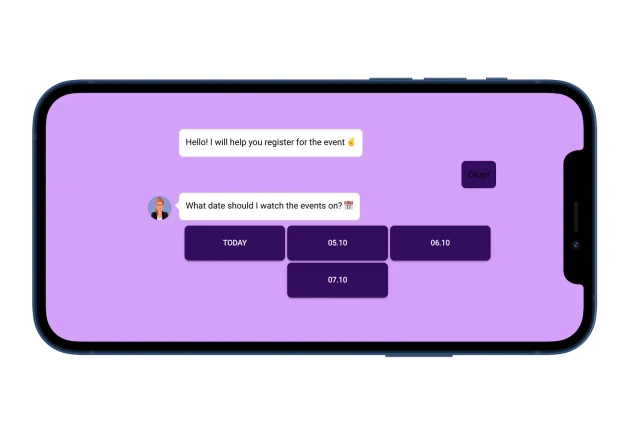
The script can be launched via a link or QR code. It works in the web version of the bot and messenger: Telegram, Facebook. The bot offers a user dates of upcoming events, automatically focusing on the time of activation. The template is configured so that the bot displays the next three days, but you can do more.
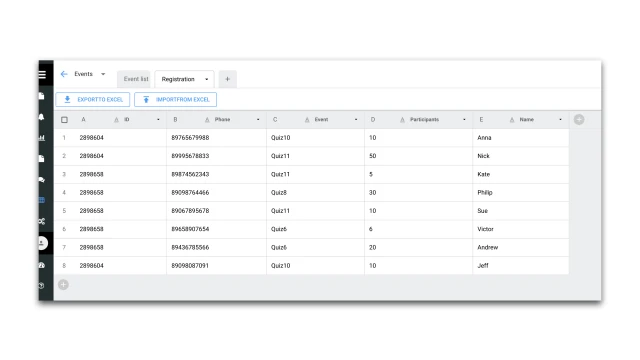
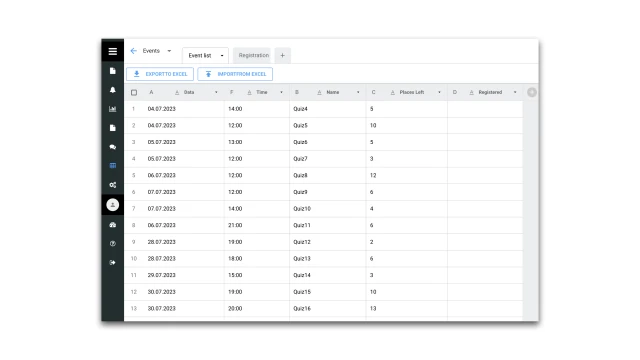
The list of events must be filled out manually in the table and supplemented with current data. You can independently specify the parameters that you want to record for yourself and show to users.

When a user has selected a date, the bot searches for all events in the list that match the request and displays the necessary parameters: date, time, event name and number of available seats.
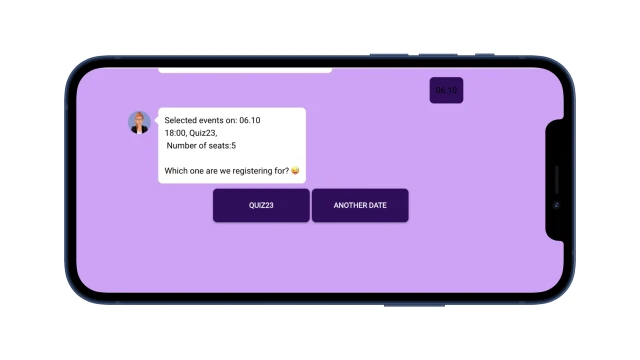
Next, the bot asks for the name, phone number, number of participants and registers for a specific event, recording the data in a separate table.
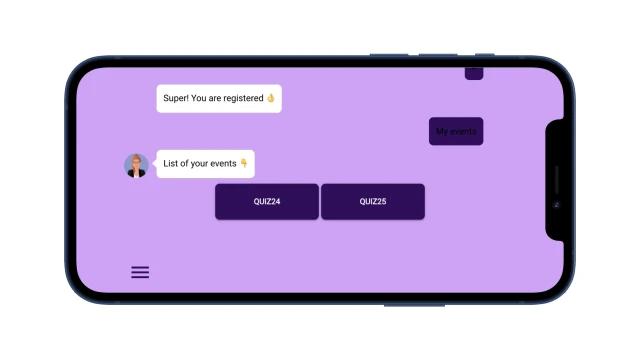
Once registered, a user can view all of his events.
How to set up the bot?
Create a project in the constructor and copy this template.
In the “Tables” section, add information on planned events. Columns can be deleted and new ones added. This table needs to be kept up to date: add new events, note the number of places.
Build a registration script for events.
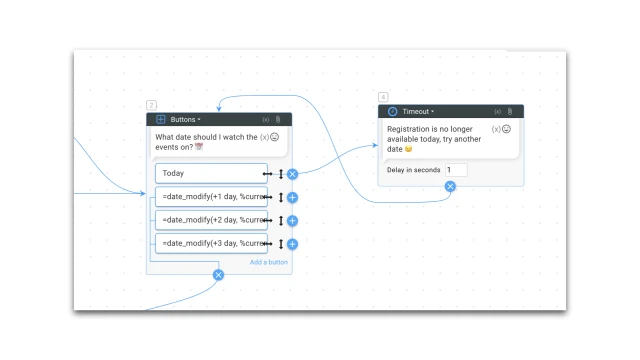
Give your bot a name. Using the “Buttons” and “Timeout” blocks, tell how the bot can be useful and offer users current events.
To configure buttons with event dates, use the formula =date_modify(+1 day, %current_date%, d.m). It allows you to add one or more days to the current date. The result depends on what number you enter in the formula. For example, if today is 08/07/2023, then after using the formula with +1 day/+2 day/+ 3 day, the bot will display the corresponding dates to the user: 08/08/2023, 08/09/2023, 08/10/2023. Buttons with dates are generated automatically every day.
Configure the display of events for the selected date.
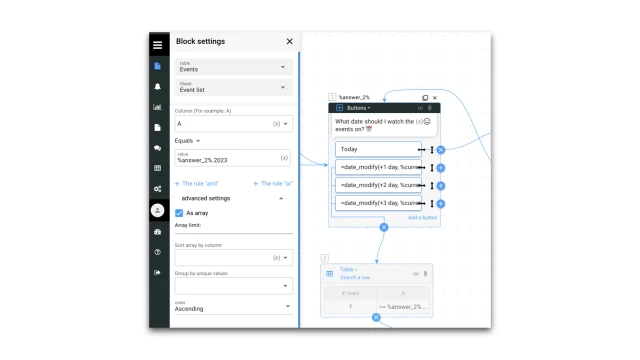
- First, the bot must find the date in the table with the list of events. Select the “Table” block, the “Line Search” block type, mark the table and table sheet.
- In the “Column” cell you need to specify the letter that represents the date column in your table. Here it is column “A”.
- In the “Value” cell, indicate the number of the block with buttons where a user selected the date (here it is %answer_2%), put a dot and add the year (without spaces).
- Below in the “Additional settings” section, check the “As an array” checkbox. Save.
*An array is a set of variables that is needed so that the bot can work with several data from a table at once.
Form the text.
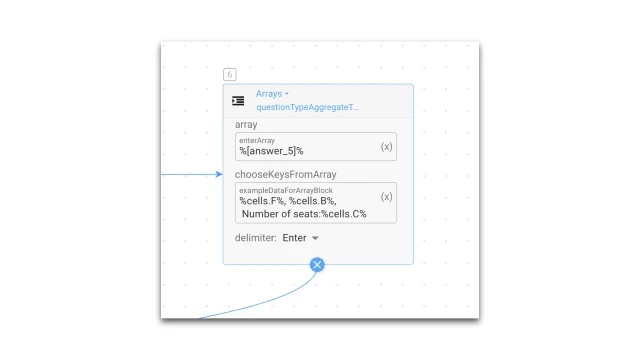
The next block “Arrays”, the type of block “Text aggregator in an array” is needed to generate the text that a user can see. In this case, we offer the name of the event, time and number of places.
- In the first line of the block, add an array of data that was formed in the table (here %[answer_5]% ).
- In the line below, specify the information you want to display to a user. These are variables corresponding to the columns of the table: %cells.F% - time, %cells.B% - event name, %cells.C% – number of remaining places.
- To make the text readable, manually add explanations, for example: number of places: %cells.C%.
Configure the display of information about events.
The “Buttons” block will display to the user all the information that we generated in the previous block.
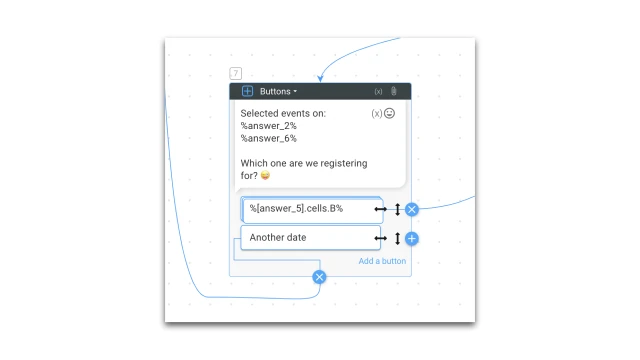
- In the “body” of the block, add the numbers of the blocks where a user selected the date and time (here %answer_2% and %answer_6%).
- So that a user can immediately sign up for one of the events, you need to add buttons in the form of an array. This will allow you to display as many buttons as there are events found for the selected date. For example, if the bot suggested events for 08/07/2023 at 18:00 and 19:00, then the bot shows two corresponding buttons. As the value of the button, add the array that was formed in the table (here %[answer_5]%), and the variable that you want to show to a user (here cells.B% is the name of the event).
Save user information.
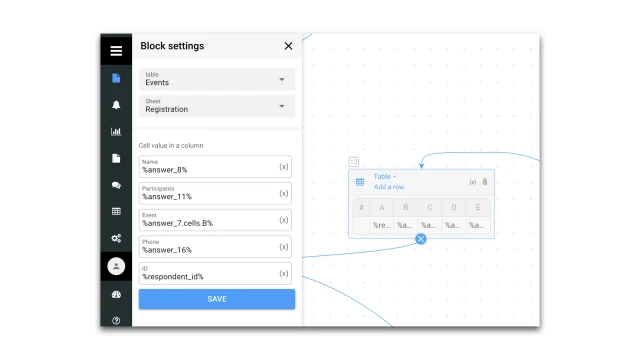
Next, we invite a user to leave his name, phone number and indicate the number of participants. We record this data in a separate table. If necessary, add other questions.
To write new data to a table, use the “Table” block, the “Add Row” block type. Fill the cells (columns in the table) with values – the numbers of the blocks where a user indicated the corresponding data. Save.
Set up the ability to view your events.
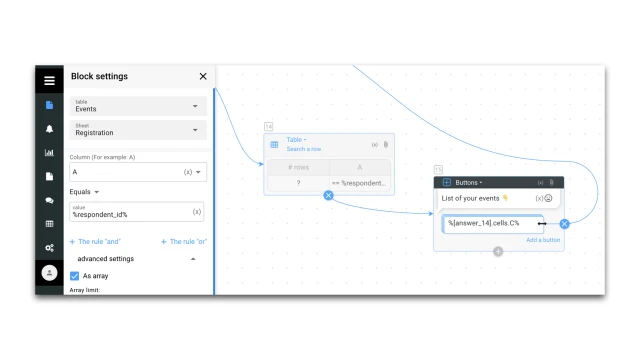
- First, the bot must find information about events in the registration table. To do this, select the “Table” block, the block type “Line Search”, specify the number of the column where a user ID is written – “A”, add the global variable %respondent_id% as a value. Below in the “Additional settings” section, check the “As an array” checkbox. Save.
- The next block “Buttons” will show a user all the events for which he is registered. In the block button, add the array that was formed in the table (here %[answer_14]) and the variable that you want to show to the user (here cells.С% is the name of the event).
And the last one.
- In the “Settings” section, configure the messenger you plan to use.
- In the "Bot Design" section, add an avatar and background for the web version of the bot.
- Test the bot.
If you have any questions, write to us on Telegram.